


LZ Motion Path v2.1.0 for Blender
LZ Motion Path v2.1.0 for Blender
Real-Time Motion Paths & Direct Keyframe Editing
Direct keyframe editing
You can edit the actual keyframes by dragging the keyframe points on the motion path with your mouse.
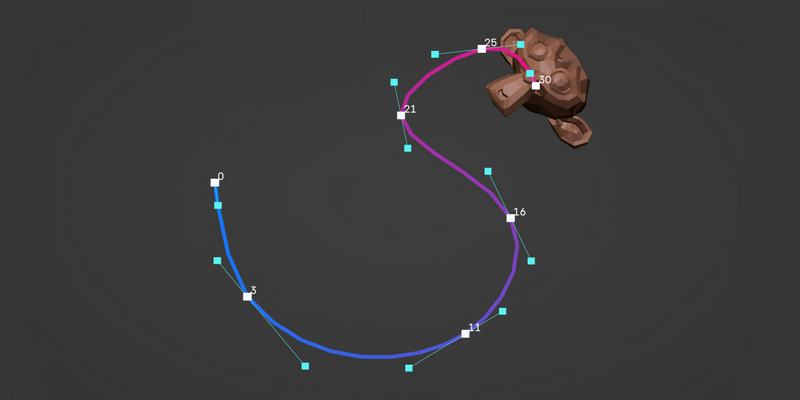
Shift : lock the axis
Pressing the Shift key while moving will snap to the nearest X, Y, and Z axis.
You can also see the amount of change from the starting point of the movement.
Shift + Ctrl : snap to the axis of another point
If you hold down Shift + Ctrl while moving and hover your mouse over another point, it will snap to the same axis as that point.
Alt+Drag : move keyframes along the timeline
This adjusts the time interval between the active keyframe and the keyframes before and after it.
While dragging, the movement speed of the keyframe is displayed by the color of the curve.
Alt+dragging on a curve will continuously move the frame to that point. This
can be used as a simple previewer for motion paths.
Alt+click : move to that frame point
Alt+clicking on the motion path moves the current frame to the frame point at that time.
Motion path handle
You can adjust the motion by manipulating the motion path handle.
This allows you to directly modify the movement of objects, making animation correction significantly easier.
Clicking a keyframe point displays the handles for that keyframe location.
Holding down Ctrl displays all handles.
Virtual handle
This handle is not a handle in the graph editor, but rather a handle created based on the virtual motion path generated by this add-on.
Editing the handles edits the virtual curve, and the animation’s movement is re-evaluated based on the trajectory of the virtual curve and reflected in the actual keyframes.
Key insertion on a motion path
Pressing the I key on the motion path inserts or removes a keyframe at that point.
The key mapping for inserted keys can be changed in the settings.
The channels to be inserted will follow the keying set.
Pinning
By registering bones and objects in the pinning list, you can display multiple motion paths simultaneously.
You can perform animation editing while checking the movement of other bones and objects.
*Pinned motion paths cannot be edited directly.
To edit them, you must actively select the object.
others
Keyframes without position transforms are displayed in a different color.
(Green by default)
Menu
The menu is displayed in Object Mode, Pose Mode, and Armature Editing Mode.
When the 3D view overlay setting is turned off, the motion path will also be hidden.
3D View > Side Menu (N) > Addons > LZ Motion Path
3D View > Center Header
You can change the thickness, transparency, and color of the motion path from the add-on settings.
DOWNLOAD FROM HOT4SHARE.COM
DOWNLOAD FROM SYNCS.ONLINE